Wednesday, 16 May 2012

Tutorial : How to hard reset Nokia N900


UPDATE:
You will need:
  • N900 (Charge up to at least 50%)
  • PC
  • Micro USB Cable
  • Your IMEI number (go to settings>About Product or under your N900 battery)
Before you look at the instructions:
Backup the N900!
This process will wipe your photos and videos. Save precious data onto your computer. Simply drag and drop them over.
For content such as contacts/settings/bookmarks/applications list, use the Backup application on the N900, but backup to a memory card only. Do not back up onto N900 as that will get wiped.
You can drag files back over and restore backup from memory card afterwards.
INSTRUCTIONS
1. Download and install Maemo 5 Flasher (Appropriate for your PC operating System – these instructions are for windows so download the windows one)

 Click http://tablets-dev.nokia.com/maemo-dev-env-downloads.php
2. Download PR 1.2 and eMMC content. You’ll need your IMEI
RX-51_2009SE_10.2010.13-2.VANILLA_PR_EMMC_MR0_ARM.bin
RX-51_2009SE_10.2010.19-1_PR_COMBINED_MR0_ARM.bin << Global Release (Will vary depending on which one you download)
3. Move both .bin files to C:\Program Files\maemo\flasher-3.5
 4. Turn off N900. Connect MicroUSB cable but not N900. Whilst holding “U” on N900′s keyboard, attach to MicroUSB.
The Nokia logo will appear and a USB icon in top right corner. Do not at any point disconnect the cable or restart N900 until step 9.
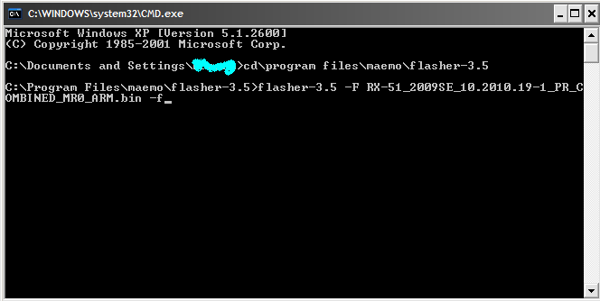
5. On the PC, click Start>Run>CMD. You’ll see a black box appear.
6. Type or copy and paste
cd\program files\maemo\flasher-3.5
7. Type of copy and paste PR1.2 >>
flasher-3.5 -F RX-51_2009SE_10.2010.19-1_PR_COMBINED_MR0_ARM.bin -f
note, the file name will differ slightly with each PR1.2 regional variant. The above is for global version.
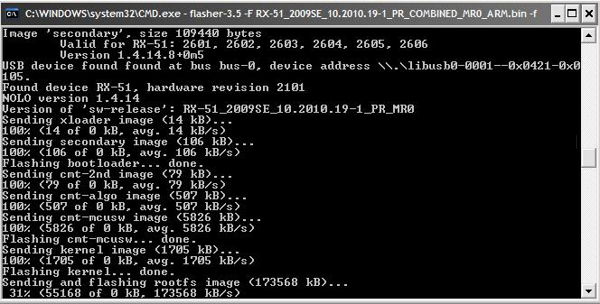
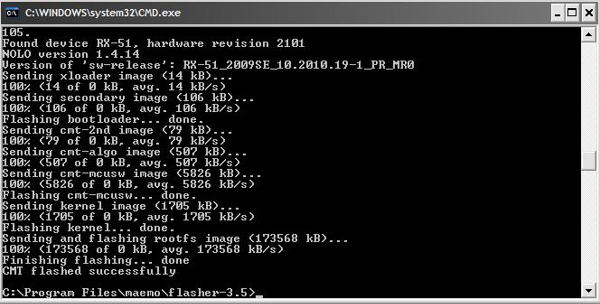
 Leave it for a couple of minutes whilst it flashes your N900 with PR1.2.
 Wait until it says “CMT Flashed successfully”.
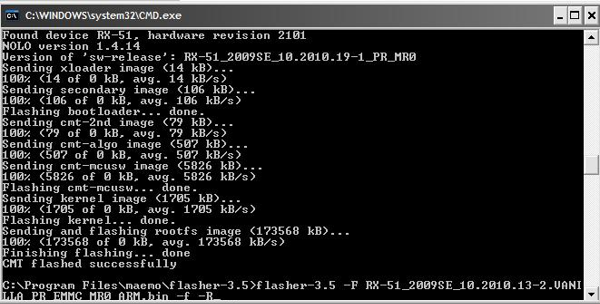
 8. Now copy and paste
flasher-3.5 -FRX-51_2009SE_10.2010.13-2.VANILLA_PR_EMMC_MR0_ARM.bin -f -R
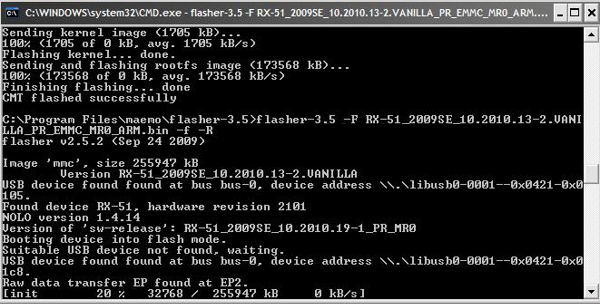
 Wait for it to finish it’s thing. You’ll know it’s finished when it says

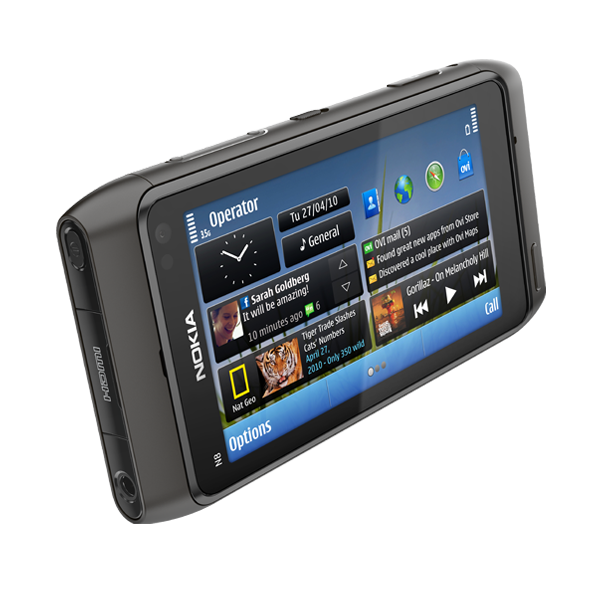
Tutorial : Hard reset your Nokia N8


If you’re unfortunate enough to encounter a problem on your Nokia N8, a hard reset maybe what you need to do. This wipes the entire phone memory and settings fresh to how it was (or should be) when you bought it. It’s also useful if you’re also unfortunate enough to have to send away your Nokia N8 for repair or exchange, or maybe in future  you maybe selling it and don’t want your information/details/media stored onto your device for someone else to access.
Hopefully unlike the N97, the N8 will not encounter hard-reset bugs where we constantly have to hard reset.
To hard reset the Nokia N8:
1) Turn off your phone
2) Hold “Volume Down + Camera Key + Menu Key” and press power button until your phone vibrates.
3) Wait until screen show properly… and welcome back!!
Comment from Sittiphol
Please note that I found these problems after doing full format:
1. I lost Ovi Maps. However, you could reinstall it by download it here
2. I also lost Ovi Store 2.0 and I can’t reinstall it since it always show “Unable to install”.
So please DON’T do full format if not neccessary or actually I must say that DO IT ONLY AS YOUR LAST CHOICE.
I have not tried this out myself and hope I’d never need to except for the curiosity maybe in a couple of weeks time to see how it functions. I hope to not be an expert of the S60 5th hard reset like the N97 had made me. Grrr.

Tutorial : Stream media to your PC through DLNA on your Symbian^3 device


In recent post, we had a few puzzled users who didn’t know how to connect their device to a PC, some users suggested the highly acclaimed XBMC for streaming, but i always knew there were simpler ways, so i researched a bit, and here is my tutorial on how use the “Play to” app. This is for people don’t have any DLNA certified device ( TV, PS3 for example ), but only have a PC, like me.
The Nokia “play to” uses the mobile DLNA protocol to stream media ( includes photos, music and video ) to any DLNA compatible device. ( more about Digital Living Network Alliance here ) There are millions of DLNA certified devices which, when connected to the same WLAN network, can share it’s media. Neat household tech, and most importantly it’s very easy too. On with the tutorial then.
You need :
  • to have the “Play to” app installed on your Symbian^3 device ( all except C6-01, who knows why ? )
  • WiFi connection, to which your PC/Laptop and your device can connect at the same time.
  • the Windows Media player 12 ( The only version of WMP that fully supports all DLNA roles ) So, basically you need Windows 7 on your PC.
After you gather the above requirements right, we shall configure our client, the PC’s Windows Media Player.
The configuration is really a two clicks affair, you need to click the “Automatically allow devices to play my media” and the “Allow remote control of my player” options under the Stream tab in Windows Media Player library view.

You get prompts for confirming your selection, like this :
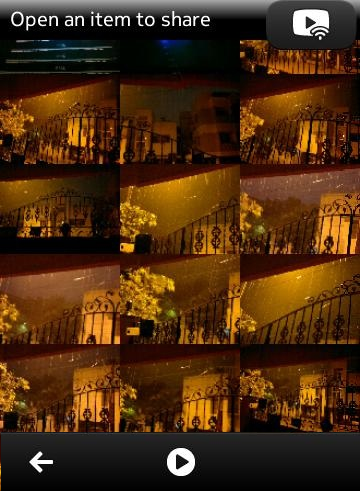
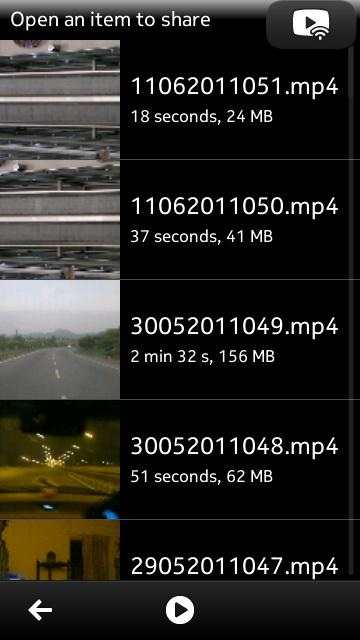
After giving permissions to the player, you are all set to stream/share media on your PC . Fire up the Play To app on your device, it will automatically search for DLNA devices and will show you the options to select, like this

The icon on the top right hand side is the one that indicates that streaming is in progress.You can click it to terminate the connection too. 
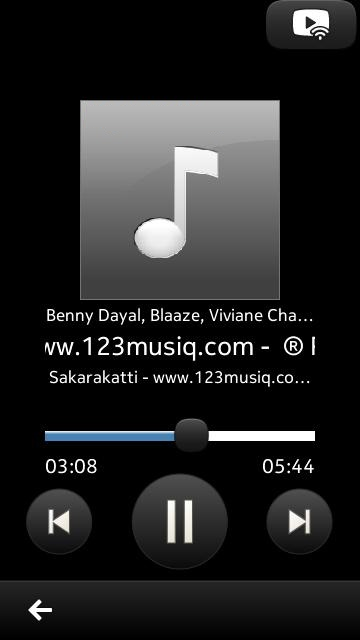
The Play symbol in the bottom bar, is the now playing/streaming icon. You can play/pause/seek music from the windows media player , also from the inbuilt music player, which has a very similar interface to the native music player for cover flow browsing, but the now playing differs and looks like this,
Videos can be streamed at full resolution i.e 720p and this, in my opinion is the most useful sharing option, we can instantly preview our videos . And it’s UI too is similar to the Videos native application.
It’s all very simple, just click any photo/music or video and there it is , on your PC monitor ,showing/playing your media through Windows Media Player.
Hope you liked my tutorial, do let me know if you face any problems.
Note : If “Play to” cannot find your PC, restart windows media player and do not play/view anything while trying to connect through DLNA.
Thanks and share this post if you like it !

Tutorial : Change to Nokia Pure font now!

Nokia Pure , the new typeface , which was launched recently during the design week has garnered a lot of attention. The Brandbook blog has given us a glimpse of the new type face in this screenshot comparing the old Nokia Sans font and the new Pure font.


You might have seen a tutorial for changing the fonts (kind note : for symbian^3 devices only *including E7*) earlier, but there was a flaw , Qt apps broke. But now, after the release of beta Qt 4.7.2 those issues are gone and even Qt apps are sporting the new font. For example , the ovi store ,which used to break while it was in  Qt 4.7, proof here :
The above font , yeah you guessed it right, it’s the new Nokia Pure typeface.
Thanks to the fine folks from art4symbian, the missing icons have been enabled ! 
Download Nokia Pure with mobile specific wingdings (Apparently it fixes the boldness issue too!)
A quick tutorial :
Here’s what you should do :
[For symbian^3 phones only,for other Symbian  devices (V5,V3) use FontRouter]
Get Qt 4.7.2 binaries : Core , Webkit Mobility
1. Make sure you have a memory card in your Symbian^3 device ,use mass memory for the E7 .
2. Then get any True type font you wish ( should be of extension .ttf ) . for exampleNokia Pure.ttf
3. Now navigate to the Resource folder in memory card’s Root ( for example if M: is memory card , navigate to M:/Resource , if its not there, create one)
4.Now create a Folder called Fonts in M:/Resource ( So the folder path should beM:/Resource/Fonts )
5.Now this is the most important step :
Make four copies of the font you have and rename the same font to the corresponding filenames. ( for example: if you have helvetica(01).ttf rename it to nosnr60.ttf , like wise rename others to respective filenames given below )
nosnr60.ttf
nssb60.ttf
nstsb60.ttf
S60ZDIGI.ttf
6. After you have renamed to the above filenames, Copy them to the Fonts folder In M:/Resource/Fonts.
Now reboot the phone and enjoy your new fonts :)
Update : It works for Nokia E7 too, just use mass memory instead of memory card.

Some screenshots, and limitations explained :
The limitations, for now , the only Pure font available for download is the webfont which does not include certain symbols , for example :
So, similar icons like space bar and other display just boxes or some garbage value. This is mainly because the font you downloaded is a web font which is not optimized for our devices. Also in list view, like in messages and contacts and wherever list is implemented, the font is slightly bolder.Example here :
Again all this trouble attributes the fact that it is indeed a webfont, not a mobile optimized font. I recommend setting the font size to small in the display settings.
One more problem is, the OS cannot read the fonts if your device is connected to the PC in mass storage mode( Your theme changes if u had installed that theme in mass memory, like wise applications turn into question marks ) but don’t worry , it will be all fine after removing the cable.
That’s it for now, do let us know if you have any trouble installing the fonts.
Quick trouble shooting guide :
  • Make sure you have Qt 4.7. 2 installed. if you can run Kasvopus , you already have Qt 4.7.2.
  • Make sure you give correct names for the fonts in the M:/Resource/Fonts directory.
  • Always double check the tutorial if you get any error
  • Do not forget to reboot once,after installation of Qt 4.7.2, also again,after the copying of those fonts.
Hat tip Craig’s Blog for Nokia Pure webfont , Art4Symbian for making it compatible to Symbian (Thanks for the Tip, Ravi)


Tutorial : Porting Apps from iPhone and Android to Qt


Got an Android or iPhone App? Want an even larger audience and another distribution point? Port to Qt and get your awesome app on the Ovi Store. Forum Nokia has a helpful page on their Wiki detailing instructions on porting Android and iPhone apps to Qt. The page was updated last in June, so now Nokia have 24 Million smartphones, and 41% of the GLOBAL smartphone market share (up from 40% and 21 million). Today, OPK mentioned Nokia expects 50 Million Symbian^3 devices to be shipped over next few years (though what exact time scale is not mentioned) Now also note the possible Millions of MeeGo devices, not just from Nokia, but from the 20 partners lined up to make MeeGo devices. Plus there’s the Maemo 5 crowd (N900 users).

The programming language for Qt is C++. Modern classes and functions that are familiar from other technologies make it extremely easy to adapt to this language. If you are experienced with the Objective-C or Java™ programming language, you will have your first Qt C++ project running within hours.
Qt C++ is ideal for application logic, and the script-like Qt Quick speeds up the creation of advanced user interfaces. You can also write native platform code and call it from Qt, to reach each and every feature of the device.
Selecting one approach does not tie your hands. You can freely code the network functionality with low-level Qt and make things look smooth with QML and script

Qt provides all modern classes and functionalities familiar from iPhone and Android. This makes it easy to keep the application logic close to the original when porting

How to Proceed with Porting

WordPress Developer Story
As linked above, this is a neat one to take a look at as it’s first hand example of porting from iPhone to Qt.
To make a long story short, it is easy to keep the original structure of the application when porting from iPhone to Qt. You can directly rewrite the core code to Qt just by looking at the original source
Compared to many other platforms, tweaking of the UI is incredibly quick. You can set values, launch it on the desktop, and, if it looks good, add to the device style sheet and deploy for verification’

Tutorial : Downloading Ovi Store .sis installation files from Desktop Web Browser for offline phone install

Here’s a very quick and useful tip from Laine Wallace of doitdifferent.wordpress.com on how to download the .sis/.sisx installation files directly from Ovi Store. Now why would you want this? Well you might not have WiFi or mobile data on your phone but may have access to a desktop with internet.
I’d sure as heck like a PC download and installation of apps as my uni accommodation this year has pants signal and NO WiFi. (Come on Ovi Suite!)
Installation instructions after the break!
  1. Go to http://store.ovi.com/ from your desktop web browser
  2. Sign in with your Ovi Account.
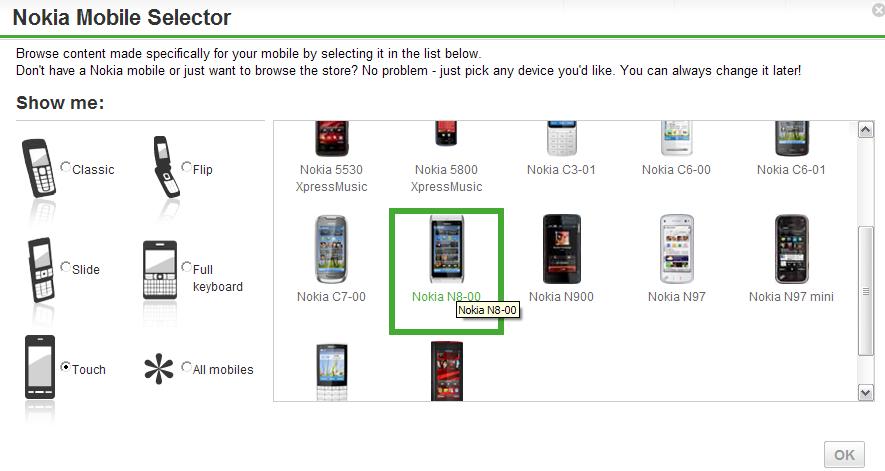
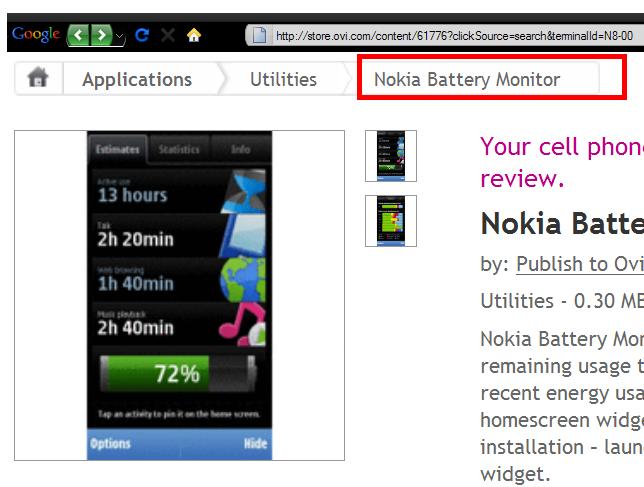
 Browse to the app you want, e.g. Nokia Battery Monitor. Note that when finding an app from search you’ll get “http://store.ovi.com/content/61776?clickSource=search&terminalId=N8-00. Click on the application name to remove the source info so it will appear like this >>http://store.ovi.com/content/61776. Or just manually delete from “?”
  1. Add  “/download” at the end of the URL: http://store.ovi.com/content/61776/download
  2. Install as you wish! You can use Ovi Suite/PC Suite to install via cable/bluetooth or you can send the files over to your phone (again via cable or bluetooth) to install directly from your phone. I like the latter as then if I store that on memory card, I have copies I can reinstall later.
Some notes from Iain:
This only works for free apps, doesn’t seem to work for bought & paid apps. Still handy though!
If I can be bothered, I might write a bookmarklet to do it for you. Would this be of interest to anyone?
I’d be interested in a bookmarklet. More so if Nokia were to just make this an easy PC experience.

Tutorial : LED Torch (for Symbian 3rd and 5th edition)


The time when you need torches the most is when they’re hardest to get to – in a black out (or brown out as they oddly call it in the Philippines). And looking for a torch is only useful if you actually own one to start with. No point trying to find the torch to check what’s rolled under your bed/sofa if you haven’t even got a torch.

Here’s a FREE application that allows Nokia 5800 owners to use the white and red LED flash as a torch.
It has a simple start/stop, switch colour mode and even the ability to convert your text into morse code flash! How brilliant is that? But now all you need is for someone else to be able to understand morse code (although it maybe useful in certain emergency situations where a flashing light maybe the only way to contact for help…such as attracting a boat if you’re desserted on an island, because that’s very likely to happen)

Please be aware that you install this at your own risk. Also there are two installation methods for signed and unsigned.
You can view these instructions and download the application fromhttp://dev.meh.at/.
Make sure though that you download the most recent version to get the latest features.

Tutorial : Using your Nokia smartphone as a modem.

One of our readers Gemma sent us an email asking for a short how-to on using your Nokia smartphone as a 3G modem. Given that it’s something I felt like a great deal of our readers would benefit from (if they didn’t already know :-P ) I decided to take up the torch and do a quick post showing this.
As we all know, when buying a Nokia device, Nokia provides their software suite installation CD in addition to other accessories. Although the CD itself is not mandatory for installing the software suite (It’s just as easy to find on the internet) the majority of users will gain access to Nokia’s Ovi Suite or PC Suite via this method.
1st step:
Install the darn thing! As much as you may be inclined to do without it there are quite a few features included with this that’ll amongst other things, allow you to use your mobile phone as a modem!
2nd step: connecting your phone to the PC.
This can be accomplished in two main ways, Bluetooth or via the USB cable provided with your phone. Either method works, though for faster download  speeds it’d be best to go the USB route (saves battery life as well!)
3rd step launch Ovi Suite or PC Suite on your PC.
You’ll be greeted by a screen much like this one. (For the sake of privacy my photos, contacts and text messages have been removed LOL :) )
 Provided that your mobile has been connected via USB, it’s really a very simple matter.
Click there and voila, you’re phone is a USB modem. This is a free feature on every sim-free/unlocked Nokia that I’ve ever owned, EVER. I’ve never incurred any extra cost for doing this and for those conscious of your data consumption, Ovi suite will provide information on the amount of data transferred and the time elapsed since the connection was opened :-) .
[Jay: Alternatively you can share your 3G connection over WiFi with apps like JoikuSpot. This is free, and the paid premium version will let you secure your connection. I like the USB function too as it also charges your device (if that's a feature)
Do be careful as some networks prohibit the use of your connection as a modem/data tethering. Also note that it becomes so much easier to consume data when browsing over PC.]

As a bonus feature to this little How-to:

How would you like to be able to send and receive text messages on your phone and reply to them without ever picking the phone up? Click on the messaging section and you’ll be brought to an area where you can back-up all the messages on your cell either manually or every time your phone is connected to your PC, send text messages to any contact you desire, read conversations in threaded, IM-style fashion and receive unobtrusive pop-up notifications on your desktop every time you receive a message.
This feature is VERY useful for texting while in class! :-)
NB. Don’t know what the scenario is for you mac users out there, but I’d imagine it being a somewhat similar procedure provided a PC-suite-esque program exists.

Nokia Lumia 90 Dual Screen Windows Phone/Windows 8 tablet


This concept comes from ScChow (h3csc)and it is the Nokia Lumia 90.  This is a dual screen tablet phone without a bezel between the two screens.
The mechanism is shown below as well as the specs.


Imaginary spec:
  • Quad-core Tegra 3 processor
  • 2x 4″ 1280×600
  • Clear Black Display
  • 1GB of RAM
  •  Dual boot
  • Windows Phone 7 (just imagine it is Tegra 3 compatible)
  • Windows 8 (ARM compatible mode)
  • Around 18mm (Nokia N900 reborn!)
  • Additional feature
  • Micro sim slot, MircroSD card slot and 3.5mm audio jack on top of the phone. (or left in tablet mode)
  • Back cover with 8mp autofocus camera, dedicated camera and volume keys. (has to be detach in tablet mode)

Nokia Concepts : Nokia Lumia ‘Coffee’ Tab Windows 8

Here's another Nokia tablet design. This one as a few of the others has the N9/Lumia style design but this one reminding me of the N8 too (perhaps the black ends on the blue edges?). This design is by Tristan who wanted to have a bit of fun speculating on what the tablet might look like. Check it out with those Nokia Purity in-earphones. The scattered coffee beans are a nice touch :) .

The camera isn’t in the middle but in the top left corner (so not impeded I guess when held in landscape with two hands). I’m not sure if those buttons are hardware or appear with the Windows 8 swipe. There’s even a nice picture below where its set in natural surroundings.
  • Lumia “coffee” tab
  • 1.4GHz cpu
  • 512Mb ram
  • 16/32/64Gb storage
  • 9.7″ AMOLED “clearblack” display (1280×800)
  • 8Mp Rear camera, 2Mp front facing camera
  • Windows 8 tablet edition
  • Wifi/3G connectivity

Delicious Facebook Digg Stumbleupon Favorites More

 
My Nokia Blog | All Rights Reserved 2012